Code: github.com/punitarani/message-queue
Building a scalable and fault-tolerant order processing system is crucial for maintaining a smooth and responsive user experience. This system will handle high traffic, ensure data integrity, and provide real-time order status updates. In this post, we'll show you how to create this system using FastAPI, PostgreSQL, RabbitMQ, Docker, and Nginx.
Table of Contents
- System Overview
- Setting Up the Database
- Building the API with FastAPI
- Implementing the Consumer with RabbitMQ
- Configuring Nginx as a Reverse Proxy
- Applicattion
- Ensuring Fault Tolerance and Data Integrity
- Conclusion
System Overview
The system we're building allows clients to place orders and retrieve their status in real-time. Here's a high-level view of how the components interact:
- Client: Sends HTTP requests to place orders and check their status.
- API (FastAPI): Receives client requests, interacts with the database, and publishes messages to RabbitMQ.
- Database (PostgreSQL): Stores order data and maintains data integrity.
- Message Queue (RabbitMQ): Queues order processing tasks for asynchronous handling.
- Consumer: Listens to RabbitMQ, processes orders, and updates the database.
- Nginx: Acts as a reverse proxy, managing incoming traffic and distributing it across API replicas.
This architecture ensures that the system can handle high traffic, recover gracefully from failures, and maintain accurate order records.
Architecture Diagram

- Client sends a request to Nginx.
- Nginx proxies the request to one of the API instances.
- The API interacts with PostgreSQL to store order details and publishes a message to RabbitMQ.
- Consumer services listen to RabbitMQ, process the order, and update the PostgreSQL database.
- Clients can query the API to check the status of their orders.
Results
We tested the limits of our system and achieved over 1600 requests per second with a 100% success rate on 3 API replicas and 1 consumer with only 100 concurrent database connections running on a laptop. The median latency was sub 100ms and P99 latency under 1s.
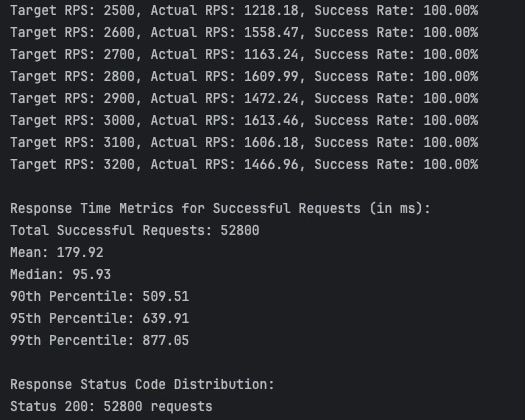
The main bottleneck was the database connection limit as we write to the database even before the order is published to RabbitMQ for processing.
Setting Up the Database
We create a simple database with a single table called orders.
-- init.sql
CREATE TABLE orders (
    id SERIAL PRIMARY KEY,
    status VARCHAR(20) NOT NULL DEFAULT 'placed',
    created_at TIMESTAMP NOT NULL DEFAULT NOW(),
    updated_at TIMESTAMP NOT NULL DEFAULT NOW()
);
Database Interaction
To interact with the database, we use asyncpg with sqlalchemy ORM to make the code cleaner and more maintainable.
"""db.py"""

from sqlalchemy.ext.asyncio import AsyncSession, create_async_engine
from sqlalchemy.orm import sessionmaker

from mq.config import get_db_url

DATABASE_URL = get_db_url()

# Create Async Engine with Connection Pool Configuration
engine = create_async_engine(
    DATABASE_URL,
    echo=False,
    pool_size=20,       # Max number of permanent connections
    max_overflow=10,    # Max number of temporary connections
    pool_timeout=60,    # Max wait time for a connection
    pool_recycle=3600,  # Recycle connections after 1 hour
)

# Create a configured "Session" class
AsyncSessionLocal = sessionmaker(
    bind=engine,
    class_=AsyncSession,
    expire_on_commit=False,
)
Connection Pooling allows us to reuse existing database connections instead of creating new ones, which saves time and resources.
pool_sizeis the maximum number of permanent connections.max_overflowis the maximum number of temporary connections.pool_timeoutis the maximum wait time for a connection. If a connection is not available within this time, an error is raised.pool_recycleis the number of seconds to recycle connections after. This is useful to prevent the database from running out of connections.
"""models.py"""

from sqlalchemy import Column, DateTime, Integer, String, func
from sqlalchemy.ext.declarative import declarative_base

Base = declarative_base()


class Order(Base):
    __tablename__ = "orders"

    id = Column(Integer, primary_key=True, index=True)
    status = Column(
        String(20),
        default="placed",
        nullable=False,
    )
    created_at = Column(
        DateTime(timezone=True),
        server_default=func.now(),
        nullable=False,
    )
    updated_at = Column(
        DateTime(timezone=True),
        onupdate=func.now(),
        default=func.now(),
        nullable=False,
    )
The Order model implementes the ORM for the orders table allowing us to interact with the database using python in a much simpler and cleaner way without having to write raw SQL.
Building the API with FastAPI
Implementing the API endpoints using FastAPI to handle order placement and status retrieval.
"""api.py"""

import json
from contextlib import asynccontextmanager

import aio_pika
from fastapi import Depends, FastAPI, HTTPException
from sqlalchemy.exc import SQLAlchemyError
from sqlalchemy.ext.asyncio import AsyncSession
from sqlalchemy.future import select

from mq.config import get_rabbitmq_url
from mq.db import AsyncSessionLocal, engine
from mq.models import Base, Order
from mq.schemas import OrderResponse, OrderStatusResponse

RABBITMQ_URL = get_rabbitmq_url()


async def get_db():
    """Get the database session"""
    async with AsyncSessionLocal() as session:
        yield session


@asynccontextmanager
async def lifespan(app: FastAPI):
    # Create tables
    async with engine.begin() as conn:
        await conn.run_sync(Base.metadata.create_all)

    app.state.rabbitmq_connection = await aio_pika.connect_robust(RABBITMQ_URL)
    app.state.channel = await app.state.rabbitmq_connection.channel()
    # Ensure the queue exists
    app.state.queue = await app.state.channel.declare_queue("order_queue", durable=True)

    yield
    await app.state.channel.close()
    await app.state.rabbitmq_connection.close()


app = FastAPI(lifespan=lifespan)


@app.post("/order/place", response_model=OrderResponse)
async def place_order(db: AsyncSession = Depends(get_db)):
    new_order = Order()
    db.add(new_order)
    await db.commit()
    await db.refresh(new_order)
    order_id = new_order.id

    message = aio_pika.Message(
        body=json.dumps({"order_id": order_id}).encode(),
        delivery_mode=aio_pika.DeliveryMode.PERSISTENT,
    )
    await app.state.channel.default_exchange.publish(message, routing_key="order_queue")
    return OrderResponse(order_id=order_id, status=new_order.status)


@app.get("/order/get/{order_id}", response_model=OrderStatusResponse)
async def get_order(order_id: int, db: AsyncSession = Depends(get_db)):
    result = await db.execute(select(Order).where(Order.id == order_id))
    order = result.scalars().first()
    if order is None:
        raise HTTPException(status_code=404, detail="Order not found")
return OrderStatusResponse(order_id=order.id, status=order.status)- Endpoints:
POST /order/place: Creates a new order, stores it in the database, and publishes a message to RabbitMQ for processing.GET /order/get/{order_id}: Retrieves the status of a specific order.
- RabbitMQ Integration:
- Startup Event: Establishes a robust connection to RabbitMQ and declares the
order_queue. - Shutdown Event: Gracefully closes the RabbitMQ connection.
- Startup Event: Establishes a robust connection to RabbitMQ and declares the
- Message Publishing:
- Orders are published to RabbitMQ with
delivery_mode=Persistentto ensure messages aren't lost if RabbitMQ restarts.
- Orders are published to RabbitMQ with
Implementing the Consumer with RabbitMQ
The consumer listens to the order_queue and processes incoming orders asynchronously.
"""consumer.py"""

import asyncio
import json
import random

import aio_pika
from sqlalchemy.future import select

from mq.config import get_rabbitmq_url
from mq.db import AsyncSessionLocal
from mq.models import Order

RABBITMQ_URL = get_rabbitmq_url()


async def process_order(message: aio_pika.IncomingMessage):
    async with message.process():
        order_data = json.loads(message.body)
        order_id = order_data["order_id"]

        async with AsyncSessionLocal() as session:
            # Fetch the order
            result = await session.execute(select(Order).where(Order.id == order_id))
            order = result.scalars().first()
            if not order:
                # Order not found
                return

            # Update status to 'processing'
            order.status = "processing"
            await session.commit()

            # Simulate processing time between 10ms and 10s
            processing_time = random.uniform(0.01, 10)
            await asyncio.sleep(processing_time)

            # Update status to 'done'
            order.status = "done"
            await session.commit()


async def main():
    connection = await aio_pika.connect_robust(RABBITMQ_URL)
    channel = await connection.channel()

    # Ensure the queue exists
    queue = await channel.declare_queue("order_queue", durable=True)

    # Create a semaphore to limit concurrent consumers to 20
    semaphore = asyncio.Semaphore(20)

    async def consumer_wrapper(message):
        async with semaphore:
            await process_order(message)

    await queue.consume(consumer_wrapper)
    try:
        await asyncio.Future()  # Keep the consumer running
    finally:
        await channel.close()
        await connection.close()


if __name__ == "__main__":
    asyncio.run(main())
Explanation:
- Processing Logic:
- Fetch Order: Retrieves the order from the database using the
order_id. - Update Status: Changes the order status to
'processing', simulates processing time, and finally updates the status to'done'.
- Fetch Order: Retrieves the order from the database using the
- Concurrency Control:
- Uses an
asyncio.Semaphoreto limit the number of concurrent order processing tasks to 20. - This prevents resource exhaustion and simulates a constrained resource in a real-world scenario.
- Uses an
- Error Handling:
- Rolls back the transaction in case of any database errors to maintain data integrity.
- Persistent Connections:
- Utilizes
connect_robustfromaio_pikafor resilient RabbitMQ connections that automatically handle reconnections.
- Utilizes
Configuring Nginx as a Reverse Proxy
nginx.conf
Nginx serves as a reverse proxy, distributing incoming HTTP requests to multiple API instances.
# nginx.conf

events {
    worker_connections 1024;
}

http {
    upstream api_servers {
        server api:3000;
    }

    server {
        listen 80;

        location / {
            proxy_pass http://api_servers;
            proxy_set_header Host $host;
            proxy_set_header X-Real-IP $remote_addr;
            proxy_set_header X-Forwarded-For $proxy_add_x_forwarded_for;
            proxy_set_header X-Forwarded-Proto $scheme;
        }
    }
}
Explanation:
worker_connections 1024limits the number of connections to 1024 per worker.upstream api_servers { server api:3000; }forwards client requests to the API running on port3000.- This is the port that the FastAPI application is running on.
listen 80specifies that Nginx should listen on port80for incoming HTTP requests.- You can connect to the Nginx server using
http://localhost:80.
- You can connect to the Nginx server using
proxy_passpasses the request to the API.proxy_set_headerpreserves important headers for logging and security.
Benefits:
- Horizontal Scaling: Easy to scale horizontally by adding more API instances to ensure high availability to the clients.
- Load Balancing: Can be extended to include multiple API instances for better load distribution.
Application
We use Docker Compose to define and run the database, message broker, API, and consumer services.
Postgres
postgres:
  image: postgres:13-alpine
  environment:
  POSTGRES_USER: user
  POSTGRES_PASSWORD: password
  POSTGRES_DB: db
  volumes:
    - ./init.sql:/docker-entrypoint-initdb.d/init.sql
  healthcheck:
  test: ["CMD-SHELL", "pg_isready -U user -d db"]
  interval: 5s
  timeout: 5s
retries: 5- Runs PostgreSQL database using the official Alpine-based image
- Initializes with a custom
init.sqlscript - Implements a health check to ensure readiness
RabbitMQ
rabbitmq:
  image: rabbitmq:3-management
  environment:
  RABBITMQ_DEFAULT_USER: guest
  RABBITMQ_DEFAULT_PASS: guest
  ports:
    - "5672:5672"
    - "15672:15672"
  healthcheck:
  test: ["CMD", "rabbitmq-diagnostics", "-q", "ping"]
  interval: 5s
  timeout: 5s
retries: 5- Runs RabbitMQ message broker with management UI
- Exposes ports 5672 (AMQP) and 15672 (Management UI)
- Includes a health check for operational verification
API
api:
  build:
  context: .
  dockerfile: Dockerfile
  environment:
    - DATABASE_URL=postgresql+asyncpg://user:password@postgres:5432/db
    - RABBITMQ_HOST=rabbitmq
  depends_on:
  postgres:
    condition: service_healthy
  rabbitmq:
    condition: service_healthy
  deploy:
  replicas: 3
  ports:
    - "3000"
  command:
["sh", "-c", "exec uvicorn mq.api:app --host 0.0.0.0 --port ${PORT:-3000}"]- Builds from the project's Dockerfile
- Runs multiple replicas for load balancing
- Depends on Postgres and RabbitMQ being healthy
- Exposes port 3000 internally
Consumer
consumer:
  build:
  context: .
  dockerfile: Dockerfile
  command: ["python", "-u", "-m", "mq.consumer"]
  environment:
    - DATABASE_URL=postgresql+asyncpg://user:password@postgres:5432/db
    - RABBITMQ_HOST=rabbitmq
  depends_on:
  postgres:
    condition: service_healthy
  rabbitmq:
condition: service_healthy- Builds from the same Dockerfile as the API
- Runs the message consumer script
- Depends on Postgres and RabbitMQ being healthy
Nginx
nginx:
  image: nginx:latest
  ports:
    - "80:80"
  volumes:
    - ./nginx.conf:/etc/nginx/nginx.conf:ro
  depends_on:
- api- Uses the official Nginx image
- Acts as a reverse proxy, exposing port 80 to the host
- Loads custom nginx.conf for routing
- Depends on the API service
Network Configuration
networks:
  app-network:
    driver: bridge
This connects all services to a shared network, enabling them to communicate with each other.
Explanation:
- Services:
- Postgres: Runs the PostgreSQL database with initial setup from
init.sql. Includes a health check to ensure readiness. - RabbitMQ: Hosts RabbitMQ with management UI accessible on port
15672. Also includes a health check. - API: Builds from the provided
Dockerfile, connects to Postgres and RabbitMQ, and scales to 3 replicas for load balancing. - Consumer: Processes messages from RabbitMQ, ensuring orders are handled asynchronously.
- Nginx: Acts as a reverse proxy, forwarding incoming traffic to the API service.
- Postgres: Runs the PostgreSQL database with initial setup from
- Networks: All services are connected through the
app-networkbridge network for seamless inter-service communication.
Benefits:
- Isolation: Each service runs in its own container, ensuring environment consistency.
- Scalability: Easily scale the API service by adjusting the
replicascount. - Resilience: Health checks and
restart: alwaysensure services recover from failures automatically.
Ensuring Fault Tolerance and Data Integrity
Building a robust system requires addressing potential points of failure and ensuring data remains consistent. Here's how our architecture achieves this:
1. Durable Message Queues
RabbitMQ is configured with durable=True and messages are published with delivery_mode=Persistent. This ensures that messages are not lost even if RabbitMQ restarts.
# api.py (Snippet)
message = aio_pika.Message(
    body=json.dumps({"order_id": order_id}).encode(),
    delivery_mode=aio_pika.DeliveryMode.PERSISTENT,
)
2. Database Transactions
All database operations are performed within transactions. If an error occurs during order processing, changes are rolled back to maintain data integrity.
# consumer.py (Snippet)
try:
    # Database operations
    await session.commit()
except SQLAlchemyError as e:
    await session.rollback()
    print(f"Database error processing order {order_id}: {e}")
3. Message Acknowledgment
Messages are acknowledged only after successful processing. If the consumer crashes before acknowledgment, RabbitMQ requeues the message for another attempt, preventing message loss.
# consumer.py (Snippet)
async def process_order(message: aio_pika.IncomingMessage):
    async with message.process():
        # Processing logic
4. Graceful Shutdowns
Both the API and consumer handle shutdown events gracefully, ensuring connections to RabbitMQ are closed properly to prevent message loss or corruption.
# api.py (Snippet)
@app.on_event("shutdown")
async def shutdown_event():
    await app.state.rabbitmq_connection.close()
5. Health Checks and Dependencies
Docker Compose uses health checks and depends_on with service_healthy conditions to ensure services only start when their dependencies are ready, reducing the risk of connection failures.
# docker-compose.yaml (Snippet)
api:
  depends_on:
    postgres:
      condition: service_healthy
    rabbitmq:
      condition: service_healthy
Conclusion
This project demonstrates building a scalable message queue system using FastAPI, PostgreSQL, RabbitMQ, Docker, and Nginx. It handles thousands of requests per second and showcases a basic microservice architecture.
The guide covers setup, integration, and basic fault tolerance. While not production-ready, it's a solid starting point for understanding scalable system concepts.